
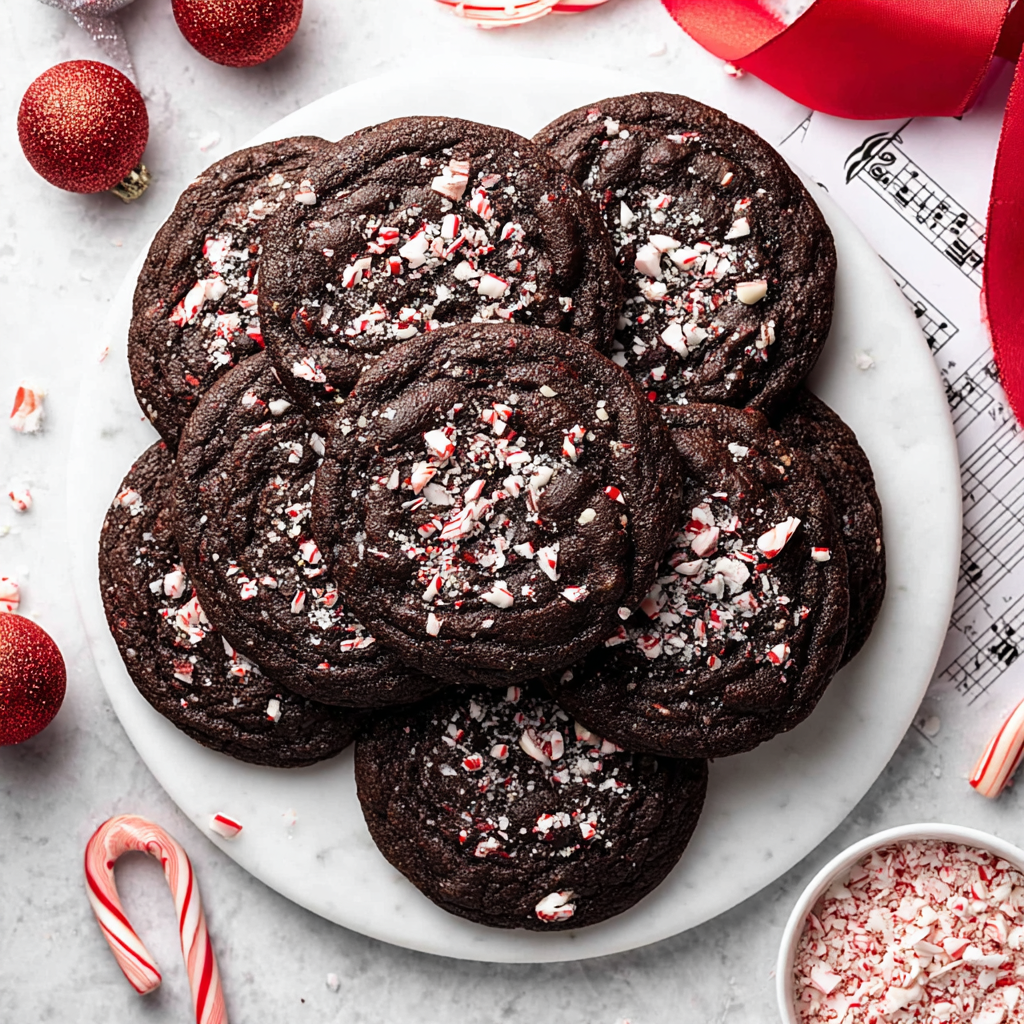
Double Chocolate Peppermint Cookies

Rich, fudgy chocolate cookies studded with peppermint and chocolate chips — a festive, easy-to-make treat that’s perfect for holiday plates and cookie exchanges.

Why You'll Love This Recipe
- Ultra-chocolatey: Uses Dutch-process cocoa plus semi-sweet chips for a layered chocolate profile that stays rich after cooling.
- Fast and approachable: Ready to bake in about 20 minutes of prep — perfect for last-minute baking or an afternoon with kids.
- Make-ahead dough: Dough freezes well in portions, so you can bake fresh cookies whenever guests arrive.
- Pantry-friendly ingredients: Most items are staples (flour, sugar, butter, cocoa) and peppermint chips are easy to find during the holidays.
- Customizable texture: Bake 10 minutes for chewier centers or 12 minutes for crispier edges — both delicious.
- Great for gifting: Stores and travels well in airtight tins for cookie exchanges and gift boxes.
I started bringing these to family gatherings after a trial batch that impressed even the most discerning peppermint skeptics. My younger cousin once ate three in a row and announced they were "the best cookie ever," which sealed this recipe's place in our holiday rotation. Over the years I've learned a few small tricks — like measuring flour properly and using room-temperature yolks — that make the texture reliably perfect every time.
Ingredients
- All-purpose flour (1 1/4 cups): Measure by spooning into the cup and leveling with a knife to avoid packing; too much flour will make the cookies dry. I prefer King Arthur or Pillsbury for consistent results.
- Dutch-process cocoa (1/2 cup): This provides a deeper, less acidic chocolate flavor than natural cocoa; Valrhona or Hershey's Special Dark work well.
- Baking powder and baking soda (1/2 tsp each): A small lift from both gives a slightly domed cookie without being cakey.
- Salt (1/2 tsp): Balance is everything in chocolate desserts — use fine sea salt or Morton.
- Unsalted butter (3/4 cup, softened): Room-temperature butter creamed with sugar creates a tender crumb; plug-ins like Plugra or Kerrygold add richer flavor.
- Light brown sugar (3/4 cup) and granulated sugar (1/4 cup): Brown sugar adds moisture and a slight caramel note while white sugar helps crisp edges.
- Egg yolks (2): Use yolks only for a more tender, fudgy interior — save the whites for an omelet.
- Peppermint extract (1 tsp) and vanilla (1 tsp): Peppermint extract should be used sparingly — 1 teaspoon gives a clear mint note without overpowering the chocolate. Vanilla adds depth; I like vanilla bean paste for visual flecks.
- Peppermint chips (1/2 cup): I use Andes Peppermint Baking Chips (100 grams approximate); they melt into creamy mint pockets.
- Semi-sweet chocolate chips (1/4 cup): Use good-quality chips for melty chocolate pockets; Ghirardelli or Nestlé Toll House are good choices.
- Optional topping - crushed candy canes (2 tbsp): Sprinkle while warm for a festive crunch and color contrast.
Instructions
Preheat and prepare pans: Heat the oven to 350°F (175°C). Line two baking sheets with parchment paper — this ensures even browning and makes cleanup simple. If you prefer chewier bottoms, use a light-colored baking sheet; dark sheets encourage faster browning. Cream butter and sugars: In a large bowl, add 3/4 cup softened unsalted butter, 3/4 cup light brown sugar, and 1/4 cup granulated sugar. Using an electric mixer on medium-high, cream for about two minutes until light and fluffy. Stop and scrape the bowl at least once so everything incorporates evenly. Proper creaming traps air and creates a lift in the cookie. Add yolks and extracts: Mix in the two room-temperature egg yolks, 1 teaspoon peppermint extract, and 1 teaspoon vanilla (or vanilla bean paste). Beat on medium for about two minutes until the mixture looks pale. Room-temperature yolks mix more easily and help achieve a smooth texture. Combine dry ingredients: Whisk together 1 1/4 cups all-purpose flour, 1/2 cup Dutch-process cocoa, 1/2 teaspoon baking powder, 1/2 teaspoon baking soda, and 1/2 teaspoon salt in a separate bowl. Add to the wet mixture and mix on low until just combined — overmixing develops gluten and will toughen the cookie. Fold in chips: Gently fold in 1/2 cup peppermint chips and 1/4 cup semi-sweet chocolate chips until evenly distributed. Use a rubber spatula to avoid overworking the dough. Scoop and bake: Scoop the dough into 18 equal portions (about 1 1/2 tablespoons each) and place two inches apart on the prepared sheets. Bake for 10–12 minutes: 10 minutes yields a chewier center; 12 minutes gives crispier edges. Rotate pans halfway through for even baking. Cool and finish: Allow the cookies to rest on the baking sheet for two minutes, then transfer to a wire rack to cool for 10 minutes. While still warm, sprinkle 2 tablespoons crushed candy cane over the tops if using — the pieces will adhere to the surface. Store cooled cookies in an airtight container up to three days at room temperature.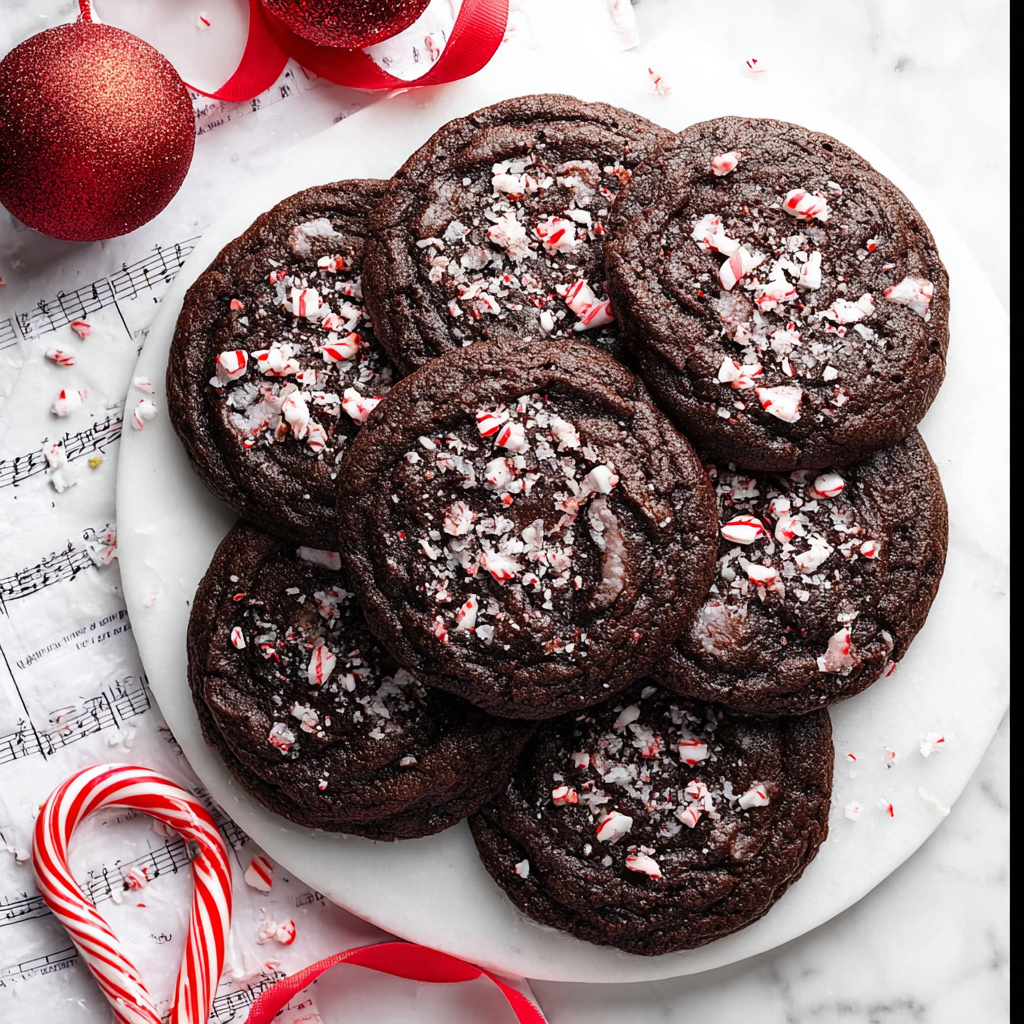
You Must Know
- These cookies freeze well: freeze unbaked dough balls on a tray for up to 3 months, then bake from frozen adding 1–2 minutes to the bake time.
- Texture tip: Underbake slightly (10 minutes) for fudgy centers; the cookies continue to set as they cool on the sheet.
- Storage: Keep in an airtight container at room temperature for up to three days, or freeze baked cookies up to two months.
- Allergen note: Contains dairy, eggs, and wheat; peppermint chips may contain soy — check labels if serving to those with allergies.
What I love most about this dough is its forgiving nature: it can be chilled for an hour to deepen flavors and make handling easier, or scooped and frozen for on-demand baking. Over the years I’ve received photos from friends who used this recipe to create cookie gift boxes, and knowing a small change like swapping peppermint chips for white chocolate created a new family favorite has been so satisfying. The contrast between the cool mint and warm chocolate makes these cookies memorable at any table.
Storage Tips
Store completely cooled cookies in an airtight container at room temperature for up to three days. For longer storage, freeze baked cookies in a single layer until firm, then stack with parchment between layers in a freezer-safe container for up to two months. To refresh frozen cookies, thaw at room temperature for 30 minutes then warm in a 300°F oven for 5–6 minutes to restore a just-baked texture. If storing unbaked dough, place scooped balls on a tray, freeze until solid, then transfer to a zip-top bag; bake directly from frozen, adding 1–2 minutes to the bake time.
Ingredient Substitutions
If you don’t have Dutch-process cocoa, you can use natural cocoa but reduce the baking soda to 1/4 teaspoon and add 1/8 teaspoon baking powder to balance acidity. For a dairy-free version, substitute vegan butter and dairy-free chocolate and peppermint chips — texture will be slightly different but still very enjoyable. To make smaller cookies, use a tablespoon scoop and reduce bake time to 8–9 minutes. If Andes chips are unavailable, chopped peppermint baking bars or white chocolate chips plus a few drops more peppermint extract will mimic the same flavor profile.
Serving Suggestions
Serve these cookies on a holiday platter with a mix of plain chocolate cookies and peppermint varieties for color contrast. They pair beautifully with hot chocolate, coffee, or eggnog — the mint cuts through rich drinks. For gifting, package in small stacks wrapped in parchment and tied with ribbon; include a small note about optimal storage and whether they are chewy or crisp based on your bake time. Garnish with a single whole peppermint chip on top of each cookie before serving for a polished presentation.
Seasonal Adaptations
In winter, emphasize peppermint by folding extra peppermint chips into half the batch and sprinkling crushed candy cane on top. For a Valentine’s twist, use dried raspberries and white chocolate instead of peppermint. In summer, omit peppermint and add a pinch of espresso powder to intensify the chocolate. For a grown-up holiday party, add 1 tablespoon of mint liqueur or crème de menthe to the dough, reducing the peppermint extract to 1/2 teaspoon to avoid overwhelming the flavor.
Meal Prep Tips
For batch baking, portion dough into 18 balls and freeze on a tray. Store frozen in airtight containers with labels noting bake temperature and time. When planning for a party, bake a test sheet first to confirm oven time, then complete the remaining sheets. Use multiple baking sheets and rotate them front-to-back and top-to-bottom halfway through baking for even results. Keep cooling racks ready — moving cookies off the hot pan prevents overbaking and ensures a tender center.
These Double Chocolate Peppermint Cookies are one of those recipes I return to year after year because they're reliably delicious and endlessly adaptable. Whether you're baking a dozen for a neighbor or dozens for a party, the combination of deep chocolate, cool mint, and flexible technique makes them a holiday staple. I hope they find a place at your table and in your memory as they have in mine.
Pro Tips
Spoon flour into the measuring cup and level off — do not pack the flour to avoid dry cookies.
Use room-temperature egg yolks for easier blending and a more tender texture.
Chill dough for 30–60 minutes for thicker cookies and more developed flavor.
This nourishing double chocolate peppermint cookies recipe is sure to be a staple in your kitchen. Enjoy every moist, high protein slice — it is perfect for breakfast or as a wholesome snack any time.
FAQs about Recipes
Can I freeze the dough?
Yes — you can freeze unbaked dough balls for up to 3 months and bake directly from frozen, adding 1–2 minutes to the bake time.
How do I get chewy vs. crispy cookies?
Bake 10 minutes for chewier centers or 12 minutes for crisper edges; cookies continue to set as they cool on the baking sheet.
Tags
Double Chocolate Peppermint Cookies
This Double Chocolate Peppermint Cookies recipe makes perfectly juicy, tender, and flavorful steak every time! Serve with potatoes and a side salad for an unforgettable dinner in under 30 minutes.
Ingredients
Dry ingredients
Wet ingredients
Mix-ins & topping
Instructions
Preheat and prepare baking sheets
Preheat oven to 350°F (175°C) and line two baking sheets with parchment paper to ensure even baking and easy cleanup.
Cream butter and sugars
Cream 3/4 cup softened unsalted butter with 3/4 cup light brown sugar and 1/4 cup granulated sugar on medium-high for about two minutes until light and fluffy, scraping the bowl once.
Add yolks and extracts
Beat in 2 room-temperature egg yolks, 1 teaspoon peppermint extract, and 1 teaspoon vanilla until pale in color and fluffy, about two minutes.
Combine dry ingredients
Whisk 1 1/4 cups flour, 1/2 cup Dutch cocoa, 1/2 teaspoon baking powder, 1/2 teaspoon baking soda, and 1/2 teaspoon salt. Mix into wet ingredients on low until just combined.
Fold in chips
Gently fold in 1/2 cup peppermint chips and 1/4 cup semi-sweet chocolate chips with a spatula until evenly distributed.
Scoop and bake
Scoop dough into 18 portions (about 1 1/2 tablespoons each), place 2 inches apart, and bake 10–12 minutes depending on desired texture. Rotate pans halfway for even baking.
Cool and top
Let cookies cool on the sheet for 2 minutes then transfer to a rack to cool completely for 10 minutes. Sprinkle crushed candy cane on warm cookies if desired.
Last Step: Please leave a rating and comment letting us know how you liked this recipe! This helps our business to thrive and continue providing free, high-quality recipes for you.
Nutrition
Did You Make This?
Leave a comment & rating below or tag
@magicmealideas on social media!
Categories:
You might also like...

Air-Fried Pizza Rolls
Crispy on the outside, gooey on the inside: easy air-fried pizza rolls made with pizza dough, mozzarella, pepperoni, and a quick Italian seasoning — perfect for snacking or feeding a crowd.
Air-Fried Rice Paper Noodle Rolls
Crispy, light rice paper rolls filled with vermicelli, vegetables and tofu or shrimp, air-fried to golden perfection for a healthy snack or shareable appetizer.

Air Fryer Apple Fries
Crispy, cinnamon-sugar coated apple sticks made in the air fryer — a quick, family-friendly treat that tastes like baked apple pie in every bite.
Did You Make This?
Leave a comment & rating below or tag @magicmealideas on social media!
Rate This Recipe
Share This Recipe
Enjoyed this recipe? Share it with friends and family, and don't forget to leave a review!
Comments (1)
This recipe looks amazing! Can't wait to try it.
Comments are stored locally in your browser. Server comments are displayed alongside your local comments.
Hi, I'm Chef!
What's Popular
30-Minute Meals!
Join to receive our email series which contains a round-up of some of our quick and easy family favorite recipes.