
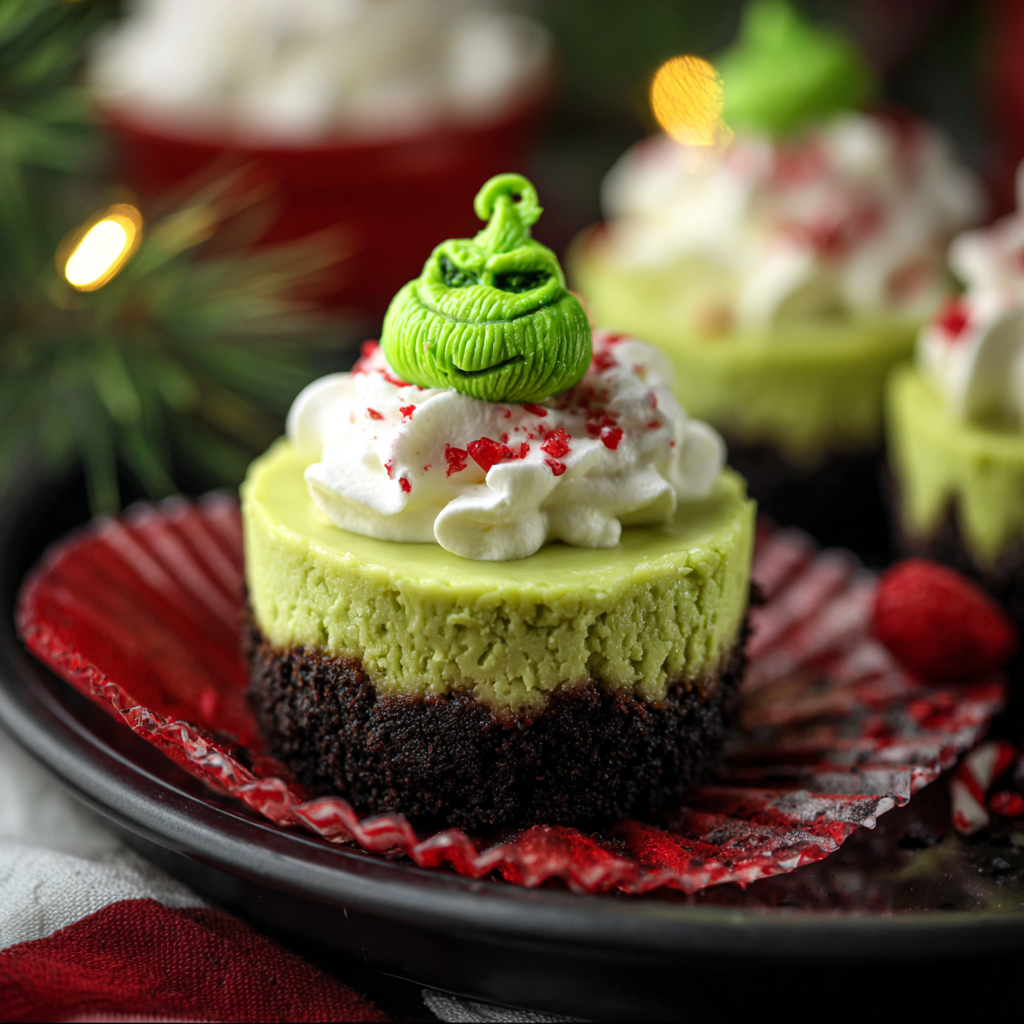
Grinch Mini Cheesecake

Bright neon green mini cheesecakes with an Oreo crust, perfect for holiday parties and kid friendly celebrations.

This bright and playful Grinch Mini Cheesecake has been my go to for holiday parties and last minute celebrations. I first made this version when a friend asked for something small and whimsical to sit on a dessert table. The striking neon green color immediately caught everyones eye and the familiar creamy flavor of cheesecake kept guests coming back for more. It combines the crunchy chocolate of an Oreo crumb base with a smooth and tangy cream cheese filling that sets just firm enough to hold a dollop of whipped cream on top.
I remember the first time I chilled a tray of these overnight and how excited my son was to see the color. He declared them officially Grinch approved. They are small enough that even picky kids try one, and festive enough for grown ups to enjoy. The texture is the key. A firm crust followed by a silken middle and a slightly jiggly center straight from the oven means you hit just the right balance between indulgence and portability. These travel well to potlucks and are forgiving to assemble, which makes them ideal for busy hosts who want a showstopping but stress free sweet.
Why You'll Love This Recipe
- Quick to make with a short bake time of about 15 to 17 minutes so you can have fresh mini cheesecakes in under an hour including chilling time.
- Uses pantry staples like cream cheese, sugar, eggs and Oreo cookies, so you rarely need a special trip to the store.
- Perfect portion control since each is a single bite size serving and ideal for parties, lunchboxes or as a festive after dinner treat.
- Customizable color and toppings. Neon green food coloring creates the Grinch look and you can top with whipped cream, sprinkles or red candy to mimic the Grinch Santa hat.
- Make ahead friendly. Once chilled they keep well in the fridge for up to three days and freeze nicely for longer storage.
When I bring these to gatherings people always ask for the recipe. The bright color makes them a conversation starter and the straightforward technique keeps me relaxed when entertaining. I love how quickly they disappear from the platter and how a simple dusting of colorful sprinkles can turn them into something magical for little ones.
Ingredients
- Crust: 1 cup Oreo crumbs and 2 1/2 tablespoons melted butter. Choose original Oreos for robust chocolate flavor. If you prefer a less sweet crust use half chocolate wafers and half graham crumbs. The melted butter binds the crumbs so press firmly for a compact base.
- Cream cheese: 16 ounces cream cheese, softened. Full fat cream cheese gives the creamiest texture and best flavor. Allow to sit at room temperature for 30 minutes so it blends smoothly without lumps. Brands like Philadelphia offer consistent results.
- Sugar: 1/2 cup granulated sugar. Granulated sugar balances the tang of the cream cheese. For a slightly less sweet version reduce to 1/3 cup.
- Eggs: 2 large eggs. Eggs provide structure and a silkier mouthfeel. Use room temperature eggs to reduce the risk of curdling and to achieve a uniform batter.
- Vanilla: 1 teaspoon pure vanilla extract. Pure vanilla rounds out the flavor and makes the filling taste less stark. Avoid imitation vanilla for a cleaner finish.
- Color: Neon green food coloring to taste. Gel food coloring gives more vibrant color with less liquid. Start with a small amount, mix, and add until you reach the desired Grinchy green.
Instructions
Preheat and prepare Preheat the oven to 350 degrees Fahrenheit. Line a 12 cup muffin pan with paper liners. Warming the oven first ensures the cheese sets evenly and the centers remain slightly jiggly but not raw. Make the crust Place about 10 to 11 Oreo cookies in a food processor and pulse until you have fine crumbs. Add 2 1/2 tablespoons of melted butter and pulse again until combined and the crumbs hold together when pressed. If you do not have a food processor, place cookies in a zip top bag and crush with a rolling pin then mix with butter. Form the base Divide the crumb mixture evenly among the liners, using about 1 to 1 1/2 tablespoons per cup. Press the crumbs firmly using the back of a spoon or a small measuring cup so the base is compact and level. A compact crust prevents the filling from sliding and gives a clean bite. Beat the filling In a medium bowl beat 16 ounces of softened cream cheese with 1/2 cup sugar until completely smooth and free of lumps. Scrape the sides often. Add 2 large eggs one at a time, blending after each addition, then mix in 1 teaspoon vanilla. Beat only until combined to avoid introducing excess air which can cause cracks. Add color and fill Mix in neon green food coloring a drop at a time until you reach the desired shade. Gel color concentrates the hue without thinning the batter. Using a small scoop or spoon add roughly 1/4 cup of filling into each crust, filling them evenly but not to the top. Bake and chill Bake in the preheated oven for 15 to 17 minutes. The centers should still be slightly jiggly when you gently shake the pan. Remove from the oven and allow to cool completely on a rack in the pan. Once cooled transfer to the refrigerator and chill for at least 2 hours or until fully set.
You Must Know
- These keep well in the refrigerator for up to three days in an airtight container and freeze for up to three months when wrapped individually and stored in a freezer safe container.
- They are not gluten free when using standard Oreos. For gluten free, use certified gluten free chocolate sandwich cookies and check all labels.
- Because the filling contains dairy and eggs they must be kept chilled and should not sit at room temperature for more than two hours.
- The centers will firm up in the fridge. Slight jiggle when warm is normal and ensures a creamy texture after chilling.
I love how this small format lets me experiment. Once I tried a salty crunch topping and the contrast was a hit. Family members ask for these throughout the holiday season and friends often request a batch for classroom parties. Theyre a fun little showstopper that is both approachable and memorable.
Storage Tips
Store cooled and chilled mini cheesecakes in a single layer in an airtight container in the refrigerator for up to three days. For longer storage freeze them arranged on a baking sheet for an hour until firm then transfer into a freezer safe container with layers separated by parchment. To thaw, move from the freezer to the refrigerator overnight. Reheat is not recommended because the texture will change. When transporting place them in a shallow box lined with parchment and avoid stacking to preserve appearance.
Ingredient Substitutions
For a lighter crust use reduced fat sandwich cookies or half graham cracker crumbs with half chocolate cookie crumbs. Swap granulated sugar for coconut sugar for a slight caramel note though the color may deepen. If you want a dairy free version try a cream cheese alternative made from cashews and a chia or flax egg, keeping in mind texture will be softer and the flavor will be different. For natural coloring try blending a small amount of spinach puree into the batter but use sparingly as it can impart an herbal flavor.
Serving Suggestions
Serve chilled with a small dollop of whipped cream and festive red sprinkles to mimic the Grinch wearing a Santa hat. They pair well with a cup of strong coffee or a bright, citrusy tea which cuts the richness. For a holiday platter arrange them with red fruit like raspberries or pomegranate seeds for contrast. They also work as dessert for a plated dinner where two mini cheesecakes can be accompanied by a smear of chocolate sauce.
Cultural Background
Miniature cheesecake cups are an American party staple that evolved from classic baked cheesecake. The mini format is ideal for social gatherings and potlucks. The Grinch theme draws on modern pop culture and is a playful seasonal twist that borrows color and narrative from a beloved holiday character. Creative food themes like this became popular as dessert tables and themed events grew over the last two decades.
Seasonal Adaptations
In winter add a touch of peppermint extract for a minty version. For spring swap the crumbs for lemon shortbread and add lemon zest to the filling for brightness. For Halloween dye the batter orange or purple and use themed sprinkles. The base method remains the same so small swaps keep the process familiar while changing the occasion specific look and flavor.
Meal Prep Tips
Make the crust and filling a day ahead. Store the crumb base in the lined pan and keep the filling covered in the refrigerator. Assemble and bake on the day you plan to serve for the freshest texture. If you need to make ahead for travel, chill overnight and transport in a chilled cooler. Label containers with the date when freezing for rotation.
There is a special joy in handing someone a tiny bright green cheesecake and watching their face light up. I encourage you to personalize the toppings and share these with family and friends. They are simple to make and generous in personality.
Pro Tips
Allow the cream cheese to come to room temperature to prevent lumps and over beating.
Use gel food coloring for a brighter color without changing the batter consistency.
Beat the eggs in slowly and stop mixing when just combined to prevent excess air and cracking.
This nourishing grinch mini cheesecake recipe is sure to be a staple in your kitchen. Enjoy every moist, high protein slice — it is perfect for breakfast or as a wholesome snack any time.
Tags
Grinch Mini Cheesecake
This Grinch Mini Cheesecake recipe makes perfectly juicy, tender, and flavorful steak every time! Serve with potatoes and a side salad for an unforgettable dinner in under 30 minutes.
Ingredients
Crust
Filling
Instructions
Preheat and prepare
Preheat oven to 350 degrees Fahrenheit and line a 12 cup muffin pan with liners.
Make the crust
Pulse about 10 to 11 Oreo cookies in a food processor until fine. Add 2 1/2 tablespoons melted butter and pulse until crumbs hold together when pressed.
Form the base
Divide crumbs evenly among liners and press firmly to form a compact base using the back of a spoon or measuring cup.
Beat the filling
Beat 16 ounces softened cream cheese with 1/2 cup sugar until smooth. Add eggs one at a time then vanilla. Mix until just combined.
Add color and fill
Stir in neon green food coloring until desired shade is reached. Spoon about 1/4 cup filling into each crust, filling evenly.
Bake and chill
Bake for 15 to 17 minutes until centers are slightly jiggly. Cool completely in the pan then refrigerate until firm, at least two hours.
Last Step: Please leave a rating and comment letting us know how you liked this recipe! This helps our business to thrive and continue providing free, high-quality recipes for you.
Nutrition
Did You Make This?
Leave a comment & rating below or tag
@magicmealideas on social media!
Categories:
You might also like...

Air-Fried Pizza Rolls
Crispy on the outside, gooey on the inside: easy air-fried pizza rolls made with pizza dough, mozzarella, pepperoni, and a quick Italian seasoning — perfect for snacking or feeding a crowd.

Air-Fried Rice Paper Noodle Rolls
Crispy, light rice paper rolls filled with vermicelli, vegetables and tofu or shrimp, air-fried to golden perfection for a healthy snack or shareable appetizer.

Air Fryer Apple Fries
Crispy, cinnamon-sugar coated apple sticks made in the air fryer — a quick, family-friendly treat that tastes like baked apple pie in every bite.
Did You Make This?
Leave a comment & rating below or tag @magicmealideas on social media!
Rate This Recipe
Share This Recipe
Enjoyed this recipe? Share it with friends and family, and don't forget to leave a review!
Comments (1)
This recipe looks amazing! Can't wait to try it.
Comments are stored locally in your browser. Server comments are displayed alongside your local comments.
Hi, I'm Chef!
What's Popular
30-Minute Meals!
Join to receive our email series which contains a round-up of some of our quick and easy family favorite recipes.