
Irresistible Dinner Rolls

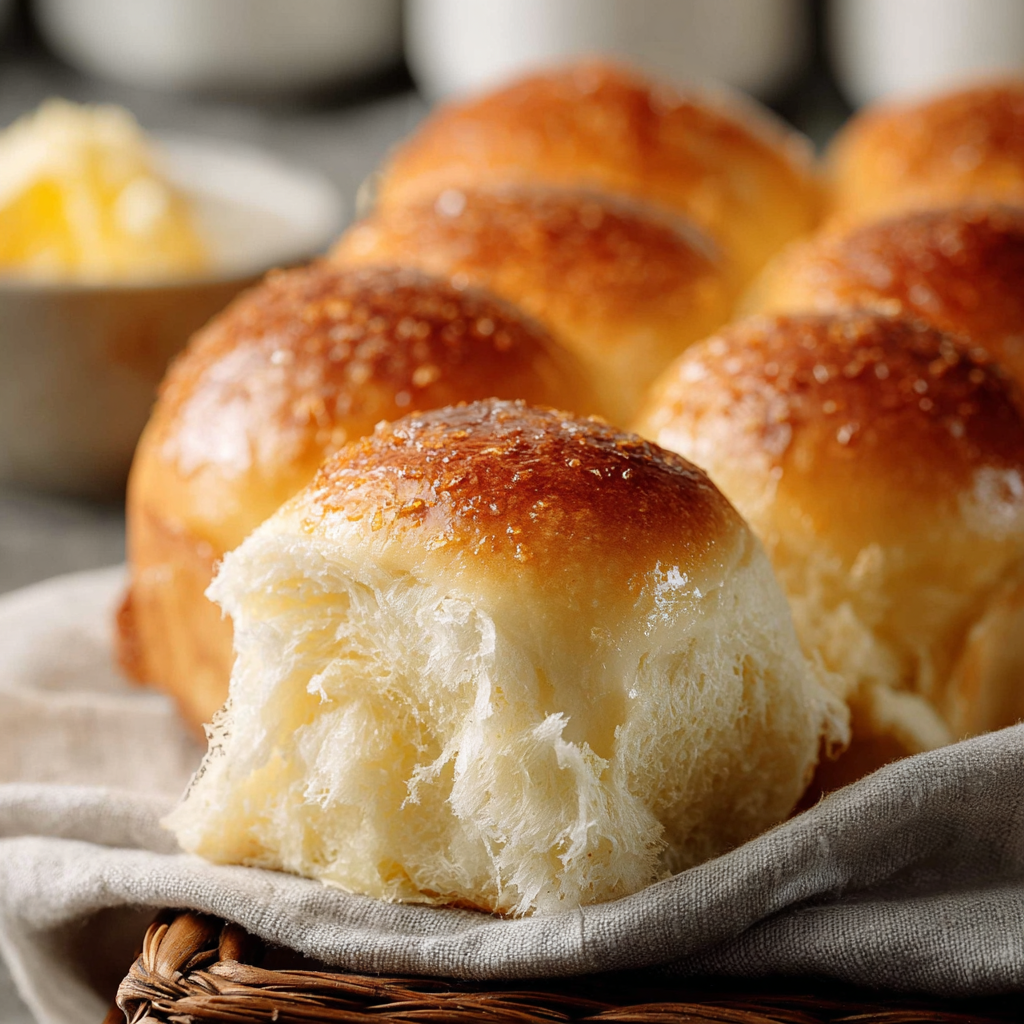
Soft, tender dinner rolls with a golden top brushed with butter. Simple ingredients, quick rises, and foolproof technique make them a weeknight favorite.
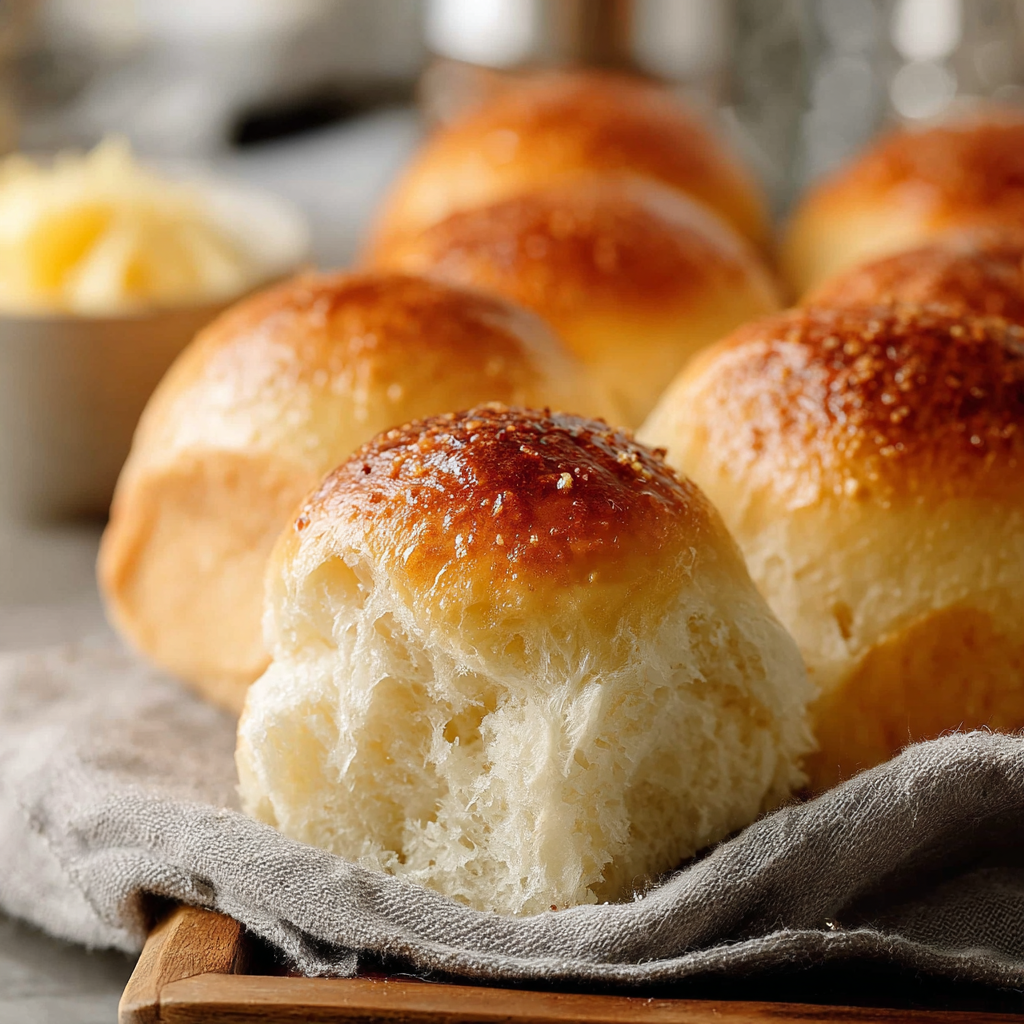
This recipe for soft dinner rolls has been a constant in my kitchen for years and for good reason. I first developed it on a rainy Sunday afternoon when guests unexpectedly stayed for dinner and I realized I had only pantry basics on hand. With a little yeast, a touch of honey, and a mix of milk and water, these rolls rose quickly and baked into tender, pillowy rounds that everyone grabbed while the main course was still simmering. They are light in texture yet substantial enough to stand up to stews and roasted meats. The crumb is delicate and slightly sweet from the honey while the top becomes a beautiful golden color when brushed with melted butter right out of the oven.
I remember the evening clearly because my youngest, who usually avoids anything too bready, polished off three rolls and declared them the best part of dinner. That moment convinced me to refine the method into something I could reproduce reliably. The key is using warm liquid at the correct temperature to wake up the yeast but not kill it and keeping the rise times short for a quick turnaround without sacrificing softness. These rolls are beginner friendly yet yield a bakery quality result that makes weeknight meals feel special. They are perfect for holiday tables, but equally welcome as quick dinner companions on a busy weeknight.
Why You'll Love This Recipe
- Quick rises and a simple mixing method mean these rolls are ready from start to finish in about one hour, making them ideal for last minute dinners.
- Uses common pantry staples such as all purpose flour, active dry yeast, honey, milk and butter so you rarely need a special trip to the store.
- Soft crumb and tender crust thanks to a combination of milk and water plus a finishing brush of melted butter for shine and flavor.
- Flexible shaping allows for classic round rolls or pull apart balls packed tightly for soft sides and a slightly chewier interior.
- Make ahead friendly you can prepare the dough the night before and refrigerate for a slow rise or freeze baked rolls for up to three months.
- Kid approved and crowd pleasing they pair beautifully with soups, roasts and holiday spreads.
When I serve these at gatherings people always ask if I bought them. I love that an everyday combination of ingredients can look and taste special. Over time I learned little tricks like keeping the towel moist during the final rise for a softer crust and brushing the tops with warm butter as soon as they come out of the oven for an irresistible shine.
Ingredients
- Water 1 cup: Use lukewarm tap water heated to about 110 degrees Fahrenheit to activate the yeast without killing it. If you have an instant read thermometer aim for 110 F. Too hot water will prevent a rise and too cool will slow activation.
- Butter 2 tablespoons, melted: Adds richness to the dough. I use unsalted butter so I can control the salt level but salted will work if that is what you have.
- Milk 1/2 cup: Whole milk gives the best tenderness and browning. You can use 2 percent for a lighter crumb or plant based milk for a dairy free version with adjusted finishing.
- Honey 2 tablespoons: Provides a subtle sweetness and helps with crust color. Light floral honey like clover or a mild wildflower works well.
- Active dry yeast 1 tablespoon: One tablespoon of active dry yeast is ideal for a relatively fast rise. Make sure it is fresh and stored properly for best activity.
- All purpose flour 3 1/2 to 4 cups: Start with 3 1/2 cups and add up to 1/2 cup more as needed. The final dough should be soft and slightly tacky but not sticky to fingers.
- Fine sea salt 1 teaspoon: Enhances flavor. Use fine salt so it dissolves evenly.
- Finishing butter: Extra melted butter for brushing the tops after baking for shine and flavor.
Instructions
Step 1 Prepare Wet Ingredients Grease a 9 by 13 inch baking dish with cooking spray and set it aside. In a microwave safe bowl or small saucepan combine 1 cup water and 2 tablespoons melted butter. Add 1/2 cup milk and 2 tablespoons honey stirring to blend. Warm the mixture gently to about 110 degrees Fahrenheit. In a microwave that means heating for one minute then stirring and continuing in 15 second increments until the temperature reads 110 F. On the stovetop warm over medium low stirring constantly to avoid scalding. Step 2 Activate Yeast Pour the warm liquid into the bowl of a stand mixer or a large mixing bowl. Sprinkle 1 tablespoon active dry yeast evenly over the surface and give it a quick stir with a fork. Let it sit for five minutes until you see a foamy cap. If foam does not appear your yeast may be old or the liquid temperature was off so start over with fresh yeast and check the water temperature. Step 3 Mix and Knead the Dough Add 3 1/2 cups all purpose flour and 1 teaspoon fine sea salt to the activated yeast. Use the dough hook on a stand mixer on medium low to combine. If the dough sticks to the sides add more flour 1/4 cup at a time up to 4 cups total until the dough pulls away from the bowl and feels slightly tacky. Knead on low speed for 4 to 5 minutes until smooth elastic and slightly springy. Step 4 First Rise Shape the dough into a ball and transfer to a well greased bowl. Cover the bowl with a damp towel and let rise in a warm draft free spot for 15 minutes. This brief rise develops structure and keeps the process quick while still producing a light crumb. Step 5 Shape Rolls and Final Rise Punch down the dough gently and divide into 15 equal pieces about 1.5 to 2 ounces each. Shape each piece into a smooth ball and arrange evenly in the prepared 9 by 13 inch baking dish. Cover with a moist towel and let rise for 15 to 20 minutes until slightly puffy but not doubled. Keeping the towel moist but not dripping will prevent a thick crust from forming. Step 6 Bake and Finish Preheat oven to 375 degrees Fahrenheit while the rolls finish rising. Brush the tops lightly with melted butter before baking for a richer crust. Bake for 18 to 20 minutes or until the tops are golden and an instant read thermometer inserted into the center of a roll reads 190 F. Remove from oven and brush again with warm melted butter for shine and softness. Let cool slightly before serving.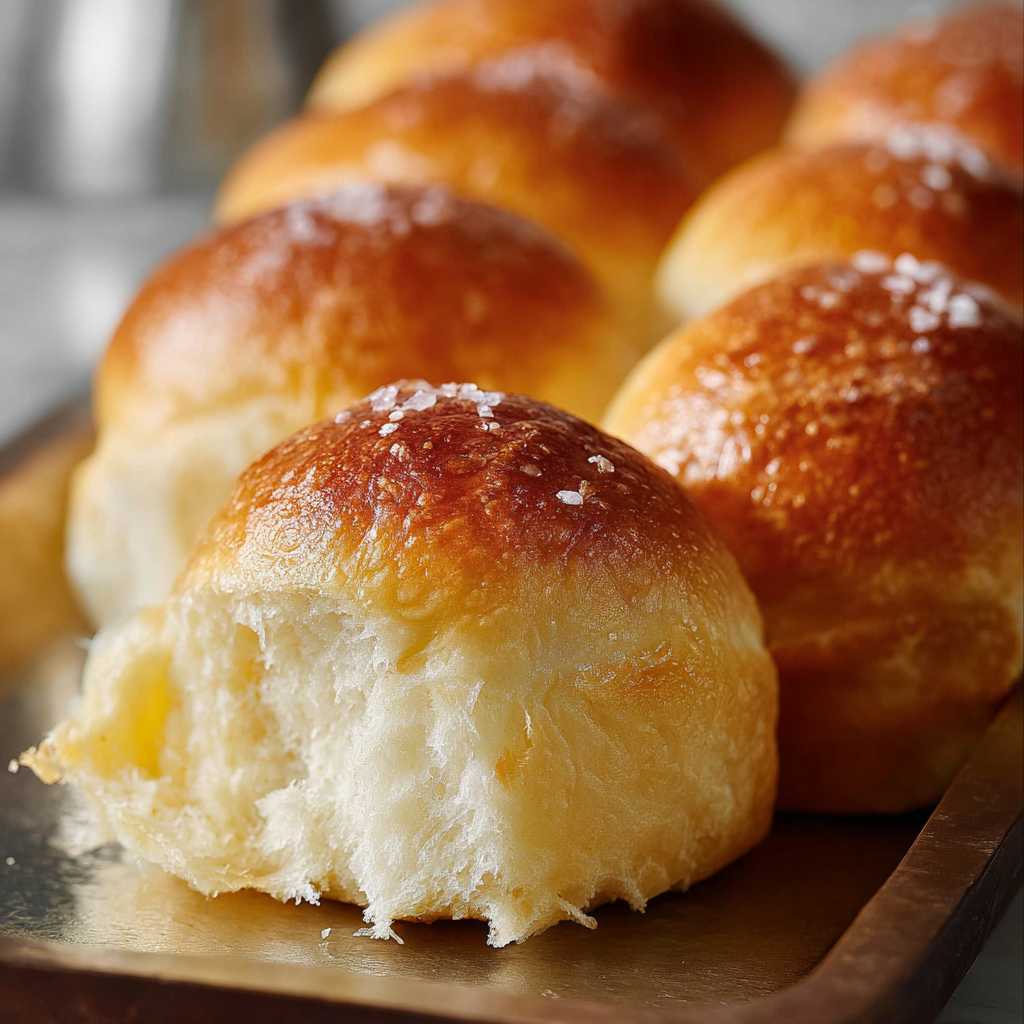
You Must Know
- These rolls are high in carbohydrates and provide quick energy making them a great accompaniment to protein rich mains.
- They freeze well baked for up to three months when wrapped tightly in foil and placed in a freezer bag.
- To reheat frozen rolls thaw overnight in the refrigerator then warm at 300 degrees Fahrenheit for 10 minutes wrapped in foil to restore softness.
- Use an instant read thermometer to check doneness 190 F in the center ensures a fully baked interior without over browning.
- For a softer crust keep the towel moist during the final rise and avoid overbaking.
My favorite part of this method is how forgiving it is. The short rise times mean you can bring the dough back into the refrigerator if dinner is delayed and finish the baking later. Over the years I have served these at holiday dinners casual Sunday suppers and impromptu potlucks. They always disappear first and people compliment the tender crumb and buttery finish. The dough tolerates small variations well so you can make minor swaps without losing the soft texture.
Storage Tips
Store cooled rolls in an airtight container at room temperature for up to two days to preserve softness. For longer storage transfer to the refrigerator in a sealed container for up to five days but note refrigeration can firm the crumb. To freeze place cooled rolls in a single layer on a baking sheet until firm then transfer to freezer bags removing as much air as possible. When reheating from frozen warm in a 300 degree Fahrenheit oven covered with foil for 12 to 15 minutes then unwrap for a few minutes to refresh the crust. For best texture avoid microwaving long term as it can make rolls gummy.
Ingredient Substitutions
If you need to adapt the recipe swap whole milk for 2 percent milk with little change in texture or use unsweetened almond milk for a dairy reduced version but finish with a plant based butter for brushing. Replace honey with brown sugar if needed using the same weight roughly two tablespoons. For a gluten free approach use a store blended all purpose gluten free flour but add a teaspoon of xanthan gum for structure and bake slightly longer checking doneness with a thermometer. Active dry yeast can be replaced by instant yeast at three quarters of the amount and stirred into dry ingredients rather than activated first.
Serving Suggestions
Serve warm brushed with extra melted butter and a sprinkle of flaky salt for an elevated touch. These are wonderful alongside roast chicken beef stew or a simple bowl of tomato soup. For holiday tables present them in a lined basket with herb butter or compound butters such as honey thyme or garlic parsley. They also make excellent mini sandwiches using sliced leftover roast meats and mustard or cranberry sauce for a festive twist.
Cultural Background
Dinner rolls are a staple in many Western tables and their simplicity reflects a tradition of using basic ingredients to create comforting breads. Variations exist across regions from soft milk rolls popular in American and British kitchens to enriched brioche style rolls found in French baking. The use of milk and butter in this version gives a tender crumb similar to traditional enriched doughs while maintaining an approachable technique for home cooks.
Seasonal Adaptations
Adapt these rolls for seasons by folding in autumn spices such as a pinch of cinnamon and nutmeg for a holiday version or add fresh herbs like chopped rosemary and thyme in spring and summer. For winter consider adding grated cheddar cheese and chives on top before baking. You can also brush with honey butter after baking for a sweeter breakfast style roll that pairs with coffee.
Meal Prep Tips
For easy meal prep make the dough the night before and refrigerate after the first slight rise. The slow cold rise develops more flavor and allows you to shape and bake in the morning with minimal fuss. Portion rolls into individual containers for lunches or freeze baked rolls in meal sized packs for quick reheating. Label and date packages so you use older batches first and always cool completely before freezing to prevent condensation that can lead to sogginess.
These rolls are a small act of kindness for any meal. Whether you keep the method simple or dress them up for a celebration they have a way of bringing people together around the table. I hope they become a staple in your kitchen as they are in mine.
Pro Tips
Use an instant read thermometer and aim for 110 F for the liquid to properly activate the yeast.
Keep the towel moist during the final rise to encourage a soft crust.
If the dough is sticky add flour 1 tablespoon at a time to avoid over drying.
This nourishing irresistible dinner rolls recipe is sure to be a staple in your kitchen. Enjoy every moist, high protein slice — it is perfect for breakfast or as a wholesome snack any time.
Tags
Irresistible Dinner Rolls
This Irresistible Dinner Rolls recipe makes perfectly juicy, tender, and flavorful steak every time! Serve with potatoes and a side salad for an unforgettable dinner in under 30 minutes.
Ingredients
Dough
Finishing
Instructions
Prepare Wet Ingredients
Grease a 9 by 13 inch baking dish. Combine water and melted butter then add milk and honey. Warm to about 110 degrees Fahrenheit either in the microwave in short increments or on the stovetop over low heat.
Activate Yeast
Pour warm liquid into a mixing bowl and sprinkle yeast on top. Stir gently and let sit five minutes until foamy to confirm yeast is active.
Mix and Knead the Dough
Add 3 1/2 cups flour and salt. Mix with a dough hook on medium low until combined. Add additional flour 1/4 cup at a time up to 4 cups total if dough is too sticky. Knead 4 to 5 minutes until smooth.
First Rise
Shape dough into a ball and put into a greased bowl. Cover with a damp towel and let rise in a warm place for 15 minutes for a quick first rise.
Shape Rolls and Final Rise
Punch down dough and divide into 15 pieces. Shape into balls and arrange in the prepared dish. Cover and let rise 15 to 20 minutes until slightly puffy.
Bake and Finish
Preheat oven to 375 degrees Fahrenheit. Brush tops with melted butter and bake 18 to 20 minutes until golden and 190 F in the center. Brush again with butter after baking and allow to cool slightly before serving.
Last Step: Please leave a rating and comment letting us know how you liked this recipe! This helps our business to thrive and continue providing free, high-quality recipes for you.
Nutrition
Did You Make This?
Leave a comment & rating below or tag
@magicmealideas on social media!
Categories:
You might also like...

Air-Fried Pizza Rolls
Crispy on the outside, gooey on the inside: easy air-fried pizza rolls made with pizza dough, mozzarella, pepperoni, and a quick Italian seasoning — perfect for snacking or feeding a crowd.
Air-Fried Rice Paper Noodle Rolls
Crispy, light rice paper rolls filled with vermicelli, vegetables and tofu or shrimp, air-fried to golden perfection for a healthy snack or shareable appetizer.

Air Fryer Apple Fries
Crispy, cinnamon-sugar coated apple sticks made in the air fryer — a quick, family-friendly treat that tastes like baked apple pie in every bite.
Did You Make This?
Leave a comment & rating below or tag @magicmealideas on social media!
Rate This Recipe
Share This Recipe
Enjoyed this recipe? Share it with friends and family, and don't forget to leave a review!
Comments (1)
This recipe looks amazing! Can't wait to try it.
Comments are stored locally in your browser. Server comments are displayed alongside your local comments.
Hi, I'm Chef!
What's Popular
30-Minute Meals!
Join to receive our email series which contains a round-up of some of our quick and easy family favorite recipes.